Wednesday, July 24, 2013

Lý Thuyết về Snort


I.NIDS LÀ GÌ:

NIDS viết tắt cụm từ A network intrusion detection system (NIDS). Mục đích sử dụng NIDS là để bảo vệ hệ thống bên trong, ngăn chặn và cảnh báo các cuộc tấn công từ bên ngoài vả các lệnh remote từ bên ngoài vào hệ thống BO (back office).

II.SNORT LÀ GÌ:
Snort là một NIDS được Martin Roesh phát triển dưới mô hình mã nguồn mở. Tuy Snort miễn phí nhưng nó lại có rất nhiều tính năng tuyệt vời mà không phải sản phẩm thương mại nào cũng có thể có được. Nó xây dựng để phát hiện và chống xâm nhập . Được thiết kế trên module để kiểm tra các gói dữ liệu vào và ra bằng cách tạo các rule phát hiện các gói dữ liệu bất thường. Snort có thể chạy trên nhiều hệ thống nền như Windows, Linux, OpenBSD, FreeBSD, NetBSD, Solaris, HP-UX, AIX, IRIX, MacOS.
Snort còn có thể được cấu hình để chạy như một NIDS. Snort hỗ trợ khả năng hoạt động trên các giao thức sau: Ethernet, 802.11,Token Ring, FDDI, Cisco HDLC, SLIP, PPP, và PF của OpenBSD.

III. CẤU TRÚC CỦA SNORT
Snort bao gồm nhiều thành phần, với mỗi phần có một chức năng riêng.
Các phần chính đó là:
Môđun giải mã gói tin (Packet Decoder)
Môđun tiền xử lý (Preprocessors)
Môđun phát hiện (Detection Engine)
Môđun log và cảnh báo (Logging and Alerting System)
Môđun kết xuất thông tin (Output Module)
Kiến trúc của Snort được mô tả trong hình sau:


1. MODULE GIẢI MÃ GÓI TIN
Snort sử dụng thư viện pcap để bắt mọi gói tin trên mạng lưu thông qua hệ thống. Hình sau mô tả việc một gói tin Ethernet sẽ được giải mã thế nào:
Bắt các gói dữ liệu các nhau của tầng network (ethernet,SLIP, PPP....)
Một gói tin sau khi được giải mã sẽ được đưa tiếp vào môđun tiền xử lý.
2.MODULE TIỀN XỬ LÝ:
Chuẩn bị dữ liệu cho hệ thống phân tích → phát hiện dữ liệu bất thường dựa vào header của gói tin → chống phân mảnh gói tin → giải mã HTTP URI → lắp ráp lại các gói (TCP, UDP ..)
3. MODULE PHÁT HIỆN
Đây là môđun quan trọng nhất của Snort. Nó chịu trách nhiệm phát hiện
các dấu hiệu xâm nhập. Môđun phát hiện sử dụng các rule định nghĩa
trước để so sánh với dữ liệu thu thập được từ đó xác định xem có hợp lệ hay không.
Một môđun phát hiện cũng có khả năng tách các phần của gói tin ra và áp
dụng các luật lên từng phần nào của gói tin đó. Các phần đó có thể là:
• IP header
• Header ở tầng giao vận: TCP, UDP
• Header ở tầng ứng dụng: DNS header, HTTP header, FTP header, ...
• Phần tải của gói tin (bạn cũng có thể áp dụng các luật lên các phần dữ
liệu được truyền đi của gói tin)
chú ý: các rule có chế độ ưu tiên nếu một gói tin bị áp dụng bởi nhiều rule thì nó chỉ thực hiện một rule có thứ tự ưu tiên nhất
4.Logging and Alerting System
Tùy thuộc vào việc môđun Phát hiện có nhận dạng đuợc xâm nhập hay không
mà gói tin có thể bị ghi log hoặc đưa ra cảnh báo. Các file log là các file text dữ
liệu trong đó có thể được ghi dưới nhiều định dạng khác nhau chẳng hạn
tcpdump.
5. MODULE XUẤT THÔNG TIN
Xuất các thông tin ra các định dang khác nhau tùy theo ta cấu hình


III. NGUYÊN TẮC CÁC RULE
Rule có 2 phần phần header và option
hình:
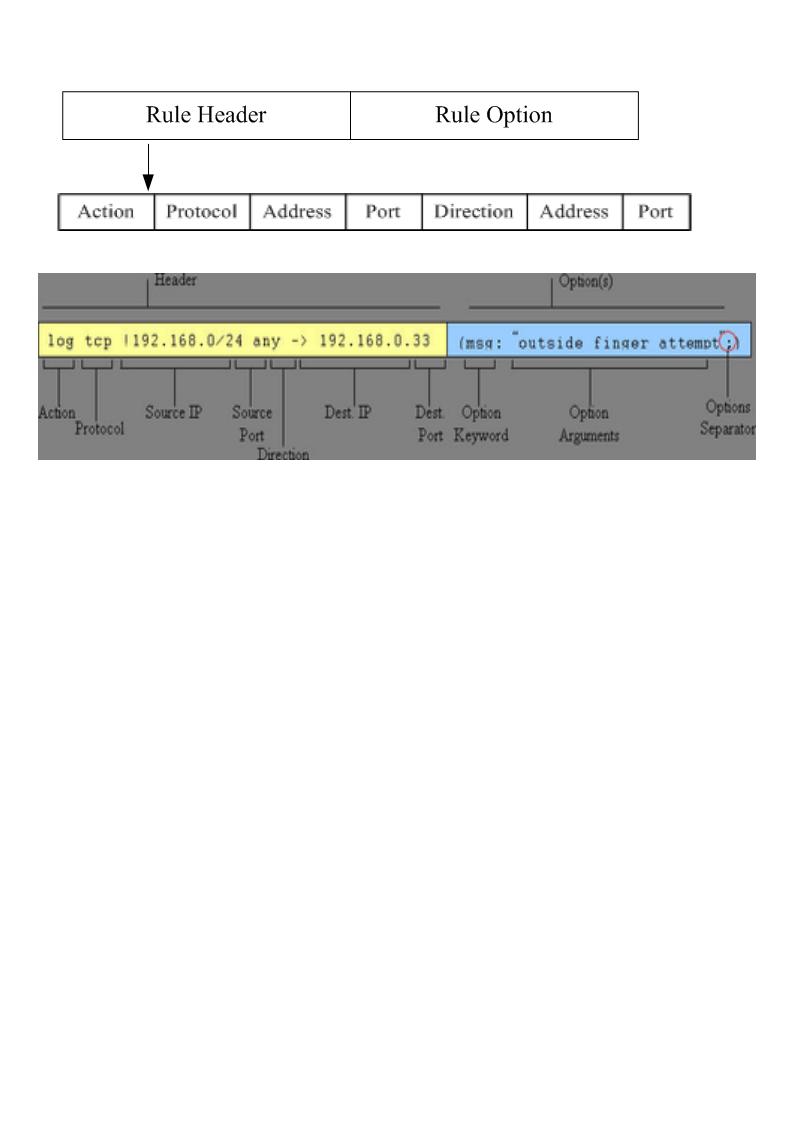
• Phần Header chứa thông tin về hành động mà luật đó sẽ thực hiện khi
phát hiện ra có xâm nhập nằm trong gói tin và nó cũng chứa các tiêu
chuẩn để áp dụng luật với gói tin đó.
• Phần Option chứa một thông điệp cảnh báo và các thông tin về các phần
của gói tin dùng để tạo nên cảnh báo. Phần Option chứa các tiêu chuẩn
phụ thêm để đối sánh luật với gói tin. Một luật có thể phát hiện được một
hay nhiều hoạt động thăm dò hay tấn công. Các luật thông minh có khả
năng áp dụng cho nhiều dấu hiệu xâm nhập.

Hành động của luật (Rule Action)

nort thì tất cả các luật sẽ được áp dụng gói tin đó.
• Pass: Hành động này hướng dẫn Snort bỏ qua gói tin này. Hành động này
đóng vai trò quan trọng trong việc tăng cường tốc độ hoạt động của Snort
khi mà ta không muốn áp dụng các kiểm tra trên các gói tin nhất định. Ví
dụ ta sử dụng các bẫy (đặt trên một máy nào đó) để nhử các hacker tấn
công vào thì ta phải cho tất cả các gói tin đi đến được máy đó. Hoặc là
dùng một máy quét để kiểm tra độ an toàn mạng của mình thì ta phải bỏ
qua tất cả các gói tin đến từ máy kiểm tra đó.
• Log: Hành động này dùng để log gói tin. Có thể log vào file hay vào cơ
sở dữ liệu tuỳ thuộc vào nhu cầu của mình.
• Alert: Gửi một thông điệp cảnh báo khi dấu hiệu xâm nhập được phát
hiện. Có nhiều cách để gửi thông điệp như gửi ra file hoặc ra một
Console. Tất nhiên là sau khi gửi thông điệp cảnh báo thì gói tin sẽ được
log lại.
• Activate: sử dụng để tạo ra một cảnh báo và kích hoạt một luật khác kiểm
tra thêm các điều kiện của gói tin.
• Dynamic: chỉ ra đây là luật được gọi bởi các luật khác có hành động là
Activate.

IV. SNORT HOẠT ĐỘNG Ở TẦNG NÀO


Thursday, July 11, 2013

Thêm bài note lại từ từ đọc ARCHIVING EMAILS - POSTFIX

Many countries in the world currently have some form of cyberlaw. In many of these countries, email messages are regarded as proper legal documents which have legal weight and meaning. For this reason and others, many companies now found themselves in the situation where they have to archive all their emails. Now leaving aside the problem of storage space which can solved by throwing disks at the issue, the one problem people seem to struggle with, is how to actually get the emails into some sort of archive. Well, Postfix has the easiest method of getting this done..

What is Needed
A linux box, oodles of space and a version of Postfix 2 or higher. The glorious thing about postfix is that even if you are a Microsoft house, you can setup postfix as an email-relay and thus still archive your mails. We will not be covering how to get postfix running here, but rather the archiving bit. So lets assume you already have a working postfix setup, lets edit your main.cf file, and add the following at the bottom..

always_bcc = <users-email-address>

Now you can use an email address on a different server in which case your line may look like..
always_bcc = bob@greengrocer.co.za

Or if you are delivering it to user homed on the postfix server (our preferred method), your line will look something like this..
always_bcc = bob

Now after you have restarted postfix, every single email your server sends or receives will be blind carbon copied to "bob". Think of "bob" as your archive. But you will also not want to use the default mailbox method of storing emails (where are emails reside in one big file) as this makes working with specific emails impossible. You rather want to use the maildir method (where every email is stored as a separate file). So in your aliases file, make "bob's" entry look like..
bob:   /var/archive/maildir/

Now under that mail folder, you should have a folder structure like this..
# pwd
/var/archive/maildir
# find ./ -type d
./
./tmp
./cur
./new

All new emails are delivered to the "new" subfolder. Told you it was easy.

Managing the archive
Ok, now you have your archive, each email is a separate file, how do you make the storage more meaningful? I use these two script files, please feel free to use them. As always, use of them at your own risk and I do not consider them works of art. Tweak and fiddle as much as you want. Firstly I have the filemail script (change the variables to match your environment)..
STORE=/var/archive/maildir/new
KEEP=/var/archive/keep
DOMAIN=greengrocer.co.za

for x in `find $STORE -type f`
 do
  echo "~~~~~~~~~~~~~~~~~~~~~~~~~~~~~~~"
  RSLT=`cat $x | grep "Return-Path"`
  PERSONTMP=`echo $RSLT | cut -f 2 -d "<"`
  PERSON=`echo $PERSONTMP | cut -f 1 -d ">"`
  echo "-checking email.. $x"
  echo "-get sender.. $PERSON"
  RSLT1=`echo $PERSON | grep -i -e "@$DOMAIN" 1> /dev/null ; echo $?`
  if [ "$RSLT1" == "0" ]
   then
    NAME=`echo $PERSON | cut -f 1 -d "@"`
    echo "-sender is a $DOMAIN person.. $NAME"
    if [ -d $KEEP/$NAME ]
         then
          echo "--archive folder exists"
         else
          echo "--archive folder does not exist .. so create it"
          mkdir $KEEP/$NAME
        fi
   echo "-so lets move the email.."
   mv -uv $x $KEEP/$NAME
   else
    echo "-sender is not a $DOMAIN person.."
        NAME=`echo $PERSON | cut -f 2 -d "@"`
        echo "-external senders domain is $NAME"
        if [ -d $KEEP/external.domains ]
     then
       echo "--archive folder exists"
     else
       echo "--archive folder does not exist .. so create it"
       mkdir $KEEP/external.domains
    fi
        echo "-so lets move the email.."
    mv -uv $x $KEEP/external.domains
  fi
  echo "~~~~~~~~~~~~~~~~~~~~~~~~~~~~~~~"
 done

This script will parse through the new subfolder and extract the sender from each email (we use reciepient as there can be multiple recipients but only one sender), if it comes from our domain it creates a folder in a specified area with the sender's name and then copies the email to that folder. If the sender is an external person, it copies it to the external.domains folder. Ok, now you have the emails sorted of senders, but can we do better? Lets sort by date. This is the sortemail script (again, update variables as needed)..
BSE=/var/archive/keep
TMPF=/tmp/sort.f.lst
TMPL=/tmp/sort.l.lst

rm -rf $TMPF
rm -rf $TMPL

echo "-Get folder names.."
for FLIST in `ls $BSE/`
 do
  echo -n "."
  echo $FLIST >> $TMPF
 done
echo "" ; echo ""

for x in `cat $TMPF`
 do
  rm -rf $TMPL
  echo "-lets do $x"
  cd $BSE/$x
  find ./ -type f -maxdepth 1 > $TMPL

  for y in `cat $TMPL`
   do
    echo $y
        FILEDATE=`date -r $y | gawk '{ print $1"-"$2$3"-"$6 }'`

    if [ -d $BSE/$x/$FILEDATE ]
         then
          echo "--folder exists"
         else
          echo "--folder does not exist..create it"
          mkdir $BSE/$x/$FILEDATE
        fi
        mv $BSE/$x/$y $BSE/$x/$FILEDATE
   done
  echo ""
 done
echo ""

This script will parse through all the sender folders, and sort the email files into subfolders named after the day the email was sent. So after running both scripts (which you can schedule via crontab to run nightly), you should have a structure like this..
# find ./lucy -type d
./lucy
./lucy/Tue-Jul18-2006
./lucy/Wed-Jul26-2006
./lucy/Thu-Jul27-2006
./lucy/Wed-Jul19-2006
./lucy/Mon-Jul17-2006
./lucy/Thu-Jul20-2006
./lucy/Fri-Jul21-2006
./lucy/Mon-Jul24-2006
./lucy/Tue-Jul25-2006
./lucy/Fri-Jul14-2006
./lucy/Fri-Jul28-2006
./lucy/Mon-Jul31-2006
./lucy/Wed-Aug2-2006
./lucy/Tue-Aug1-2006

Much better. Now you can search a lot easier.

Final Words
Obviously this paper does not take into account setting up postfix or locking down the postfix server so as to properly secure your email archive, but I hope it does show that the task of archiving your emails is not beyond your reach, and can be accomplished fairly easily. As always, have fun and learn.
source:http://www.adeptus-mechanicus.com/codex/arcpfix/arcpfix.html

Friday, July 5, 2013

Archive Email With Postfix

It took 4 steps:
  1. Create an archive email account (which can be in the same domain)
  2. Create a bcc map file
  3. Edit postfix’s mail.cf file
  4. Reload postfix
  5. Test
Setting up the archive
Setup a email account just for the archive – it can be in the same domain (because postfix won’t loop bcc’ing to itself) or a different domain. I recommend ‘archive’ followed some random numbers. You don’t want the dictionary attackers to find your archive and spam them. Make the password non-obvious and see warning below about sharing it with staff.
Create bcc map
1
2
3
cd /etc/postfix
echo "@your-domain.com" "archive12345@your-domain.com" > bcc_map
postmap bcc_map
If you want to archive an additional domain edit bcc_map and add another similarly patterned line. Note if you just wanted to archive one person’s email you could use a line like: bob@example.com archive12345@your-domain.com
Edit main.cf
Add these lines to /etc/postfix/mail.cf
1
2
sender_bcc_maps = hash:/etc/postfix/bcc_maps
recipient_bcc_maps = hash:/etc/postfix/bcc_maps
Reload
1
# /etc/init.d/postfix reload
Test
Send an email to the domain or email address you’re trying to archive. To read that email and reply back. Now you should be able to find 2 emails (minimum) in the archive12345 inbox.
Warning
Now that the archive is working, change the archive email password. Use a long random password on the archive’s acount and don/t record it or remember it.
If any staff asks to see the archive by having access to the archive via IMAP, beware. Anyone using IMAP can (and will by accident) delete archive emails.

When there is a real need to read an archive or search it, the best thing would be to allow access to a clone of the archive with IMAP access, then destroy the copy (so the client doesn’t get in the habit of using it like a regular email account).

ngoài ra chúng ta có thể tạo BCC bằng cách:
always_bcc = <users-email-address>
hai cách khác nhau chổ nào thì trải nhiệm mới biết :D


Monday, July 1, 2013

MAIL with Postfix & dovecot Trong CENTos 6.4

-->
vi /etc/postfix/main.cf
75 myhostname =mail.tencongty.com
83 mydomain = tencongty.com
99 myorigin = $mydomain
116 inet_interfaces = all
119 inet_protocols = ipv4
164 mydestination = $myhostname, localhost.$mydomain, localhost, $mydomain
264 mynetworks =10.0.0.0/8, 127.0.0.0/8
419 home_mailbox = Maildir/
545 header_checks = regexp:/etc/postfix/header_checks
546 body_checks = regexp:/etc/postfix/body_checks
678 # limit an email size 10M
679 message_size_limit = 10485760
680 # limit mailbox 1G
681 mailbox_size_limit = 1073741824
# for SMTP-Auth settings
smtpd_sasl_type = dovecot
smtpd_sasl_path = private/auth
smtpd_sasl_auth_enable = yes
smtpd_sasl_security_options = noanonymous
smtpd_sasl_local_domain = $myhostname
smtpd_client_restrictions = permit_mynetworks,reject_unknown_client,permit
smtpd_recipient_restrictions = permit_mynetworks,permit_auth_destination,permit_sasl_authenticated,reject
[root@mail ~]# vi /etc/postfix/header_checks
# add at the head
# reject if email address is empty
/^From:.*<#.*@.*>/ REJECT
/^Return-Path:.*<#.*@.*>/ REJECT
[root@mail ~]# vi /etc/postfix/body_checks
# reject if includes 'example.com' in mail body
/^(|[^>].*)example.com/ REJECT


dovecot config

[root@mail ~]# yum -y install dovecot
[root@mail ~]# vi /etc/dovecot/dovecot.conf
line 20 uncomment #
# line 31: change ( if not use IPv6 )

listen =
*
[root@mail ~]# vi /etc/dovecot/conf.d/10-auth.conf
# line 9: uncomment and change ( allow plain text auth )

disable_plaintext_auth = no
# line 97: add

auth_mechanisms = plain login
[root@mail ~]# vi /etc/dovecot/conf.d/10-mail.conf
# line 30: uncomment and add
mail_location = maildir:~/Maildir
[root@mail ~]# vi /etc/dovecot/conf.d/10-master.conf
# line 84-86: uncomment and add
# Postfix smtp-auth
unix_listener /var/spool/postfix/private/auth {
mode = 0666
user = postfix
# add
group = postfix
# add
}
[root@mail ~]#
/etc/rc.d/init.d/dovecot start
Starting Dovecot Imap:
[  OK  ]
[root@mail ~]# chkconfig dovecot on
[root@mail ~]# cd /etc/pki/tls/certs
[root@mail ~]# cd /etc/pki/tls/certs
[root@mail certs]# make server.key
umask 77 ; \
/usr/bin/openssl genrsa -aes128 2048 > server.key
Generating RSA private key, 2048 bit long modulus
..................................................................+++
..+++
e is 65537 (0x10001)
Enter pass phrase:
Verifying - Enter pass phrase:
[root@mail certs]# openssl rsa -in server.key -out server.key
Enter pass phrase for server.key:
writing RSA key
[root@mail certs]# make server.csr
umask 77 ; \
/usr/bin/openssl req -utf8 -new -key server.key -out server.csr
You are about to be asked to enter information that will be incorporated
into your certificate request.
What you are about to enter is what is called a Distinguished Name or a DN.
There are quite a few fields but you can leave some blank
For some fields there will be a default value,
If you enter '.', the field will be left blank.
-----
Country Name (2 letter code) [XX]:vn
State or Province Name (full name) []:Hochiminh
Locality Name (eg, city) [Default City]:Hochiminh
Organization Name (eg, company) [Default Company Ltd]:edu
Organizational Unit Name (eg, section) []:tencongty
Common Name (eg, your name or your server's hostname) []:mail.tencongty.com
Email Address []:admin@tencongty.com

Please enter the following 'extra' attributes
to be sent with your certificate request
A challenge password []:
An optional company name []:
[root@mail certs]#
[root@mail certs]# openssl x509 -in server.csr -out server.crt -req -signkey server.key -days 3650
Signature ok
subject=/C=vn/ST=Hochiminh/L=Hochiminh/O=edu/OU=tencongty/CN=mail.tencongty.com/emailAddress=admin@tencongty.com
Getting Private key
[root@mail certs]# chmod 400 server.*
[root@mail certs]# vi /etc/postfix/main.cf
add last line
# su dung tsl
smtpd_use_tls = yes
smtpd_tls_cert_file = /etc/pki/tls/certs/server.crt
smtpd_tls_key_file = /etc/pki/tls/certs/server.key
smtpd_tls_session_cache_database = btree:/etc/postfix/smtpd_scache


[root@mail certs]# vi /etc/postfix/master.cf

17 smtps inet n - n - - smtpd
18 -o smtpd_tls_wrappermode=yes
[root@mail certs]# vi /etc/dovecot/conf.d/10-ssl.conf
6 ssl = yes
7
8 # PEM encoded X.509 SSL/TLS certificate and private key. They're opened before
9 # dropping root privileges, so keep the key file unreadable by anyone bu t
10 # root. Included doc/mkcert.sh can be used to easily generate self-signe d
11 # certificate, just make sure to update the domains in dovecot-openssl.c nf
12 ssl_cert = </etc/pki/dovecot/certs/dovecot.pem
13 ssl_key = </etc/pki/dovecot/private/dovecot.pem

web mail
[root@mail certs]# yum -y install httpd
[root@mail certs]# rm -f /etc/httpd/conf.d/welcome.conf
[root@mail certs]# rm -f /var/www/error/noindex.html
[root@mail certs]# ln -s /usr/bin/perl /usr/local/bin/perl
[root@www ~]# vi /etc/httpd/conf/httpd.conf
# line 44: change

ServerTokens Prod
# line 76: change to ON

KeepAlive On
# line 262: Admin's address
ServerAdmin root@tencongty.com
# line 276: change to your server's name
ServerName www.tencongty.com:80
# line 331: change (enable CGI and disable Indexes)

Options FollowSymLinks ExecCGI
# line 338: change
AllowOverride All
# line 402: add file name that it can access only with directory's name
DirectoryIndex index.html index.cgi index.php
# line 536: change

ServerSignature Off
# line 759: make it comment
#
AddDefaultCharset UTF-8
# line 796: uncomment and add file-type that apache looks them CGI

AddHandler cgi-script .cgi .pl
[root@www ~]# /etc/rc.d/init.d/httpd start

Starting httpd:
[ OK ]

[root@www ~]# chkconfig httpd on